Saturday 31 May 2014

Ashleigh

Hello Folks

No apologies for another Scruffy Little Cat card today - love coluring them. Today's card features Ashleigh -
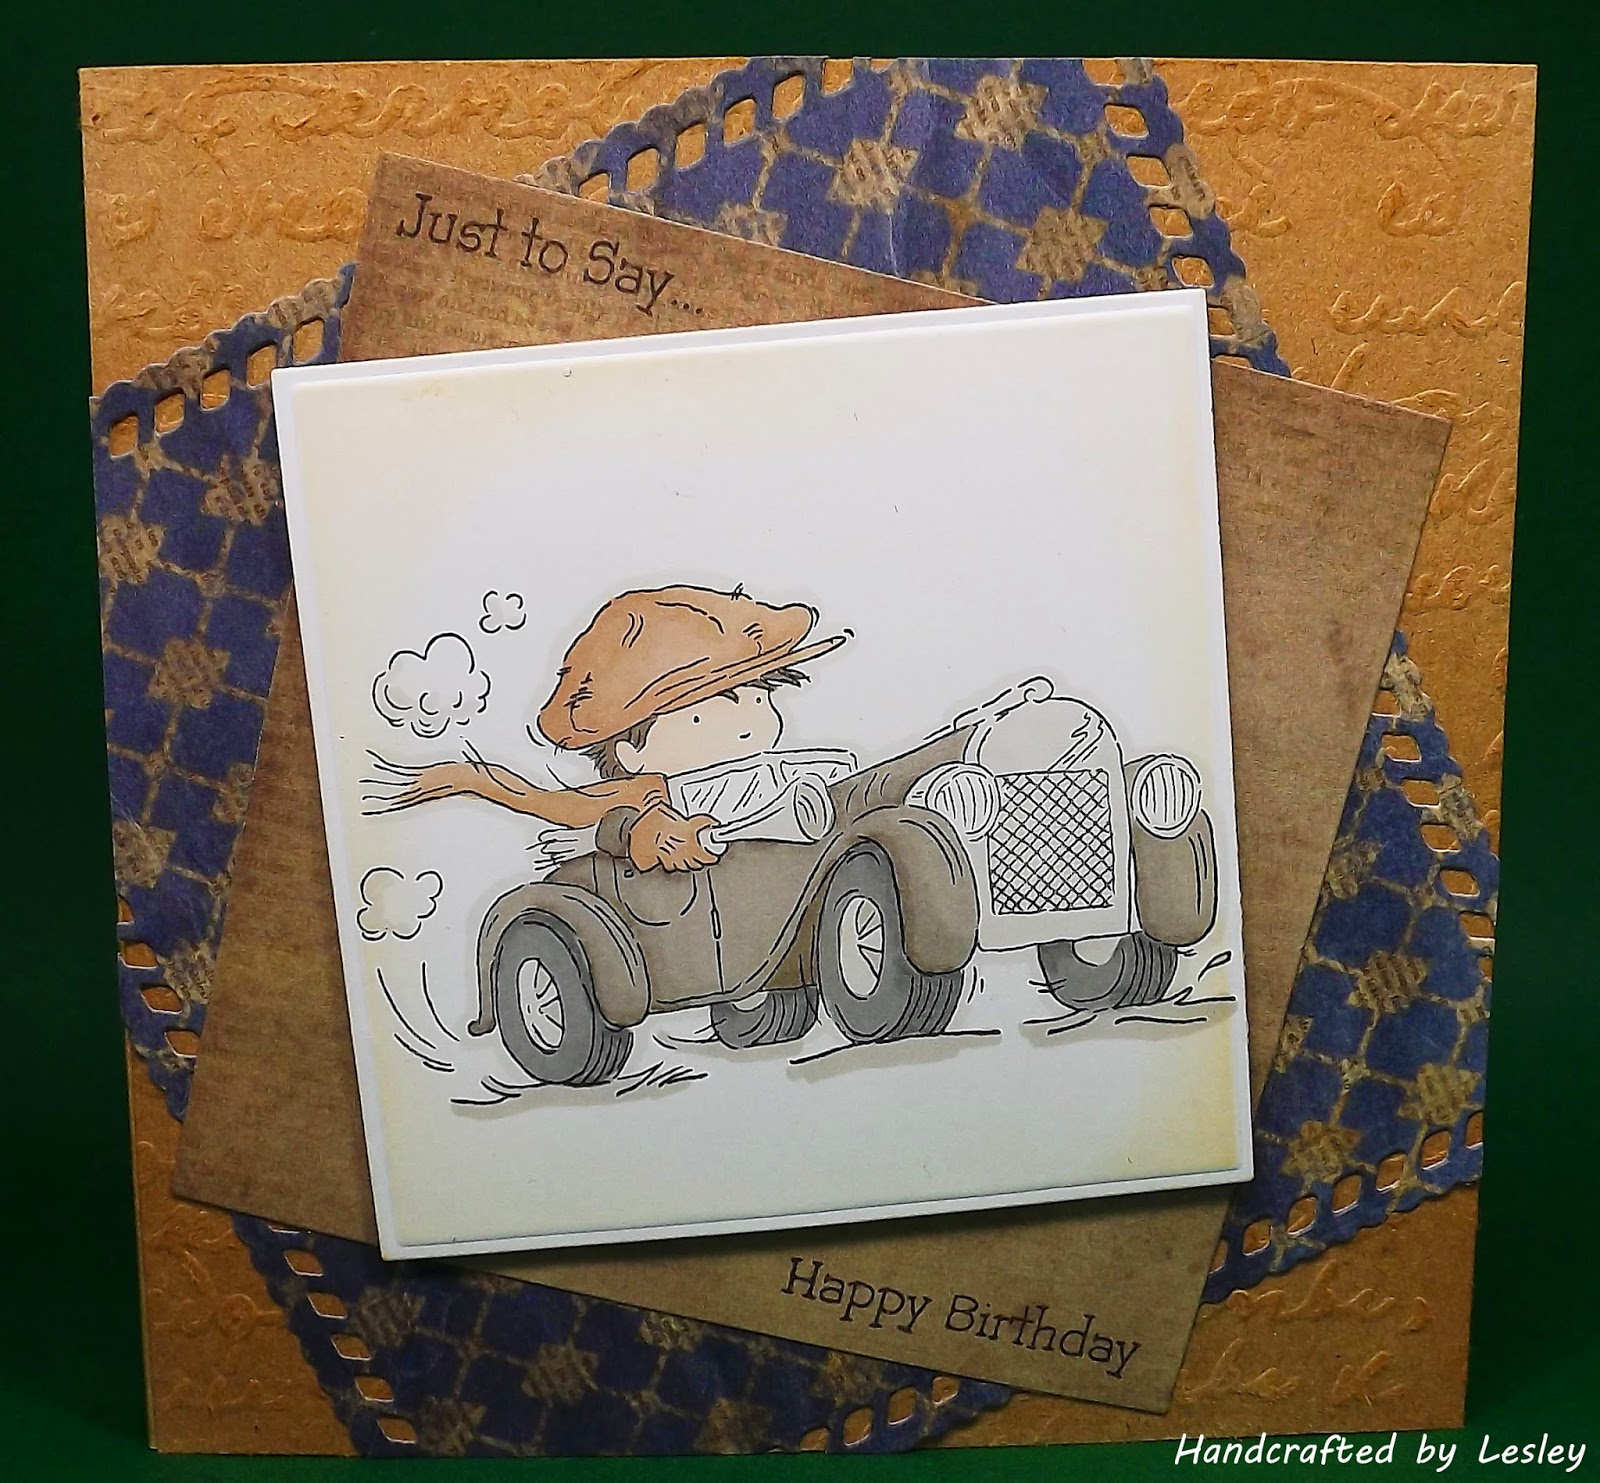
I began by making an easel card from a 6 inch card blank which I matted and layered with black centura pearl and some papers from the Scruffy Little Cat dark shades paper pack. I made the stopper using black centura pearl which I cut with a Joanna Sheen lace border die. I added another strip of paper from the paper pad and then wrapped some black satin ribbon around. I attached the stopper to the card base with foam pads as shown.
As I said at the start of this post the image is Ashleigh (from Scruffy Little cat range from Crafter's Companion) which I have coloured with the following Spectrum Noirs - 
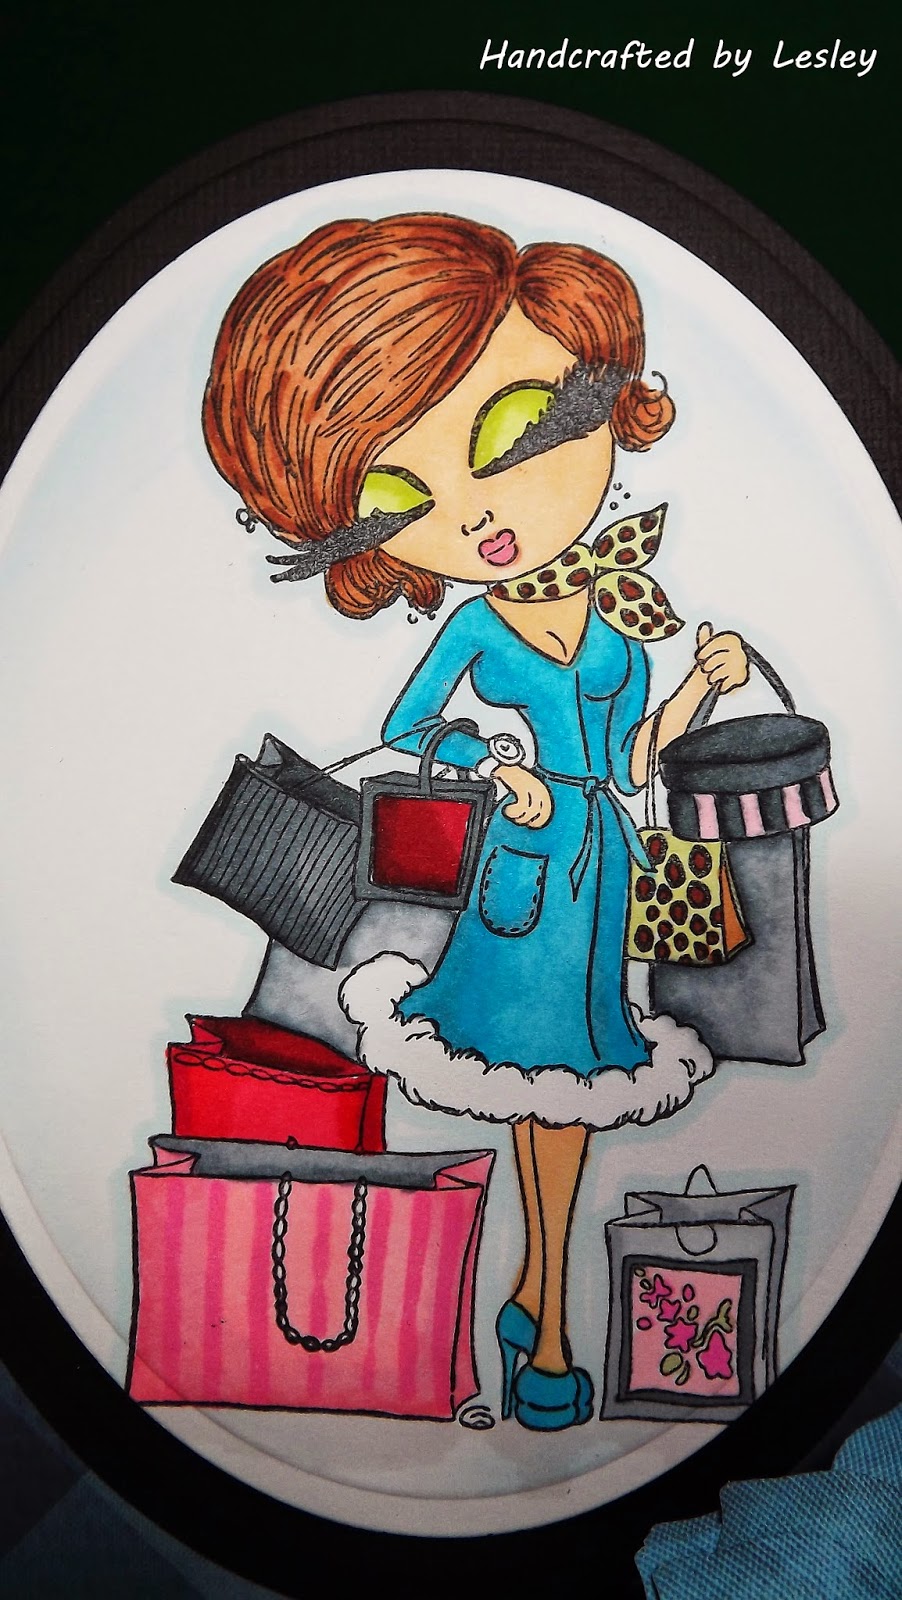
  • hair - TN3, TN5, TN7 and TN8
  • skin - FS1, FS3 and FS5
  • lips - CR6
  • eyeshadow - CG1, CG3 and DG2
  • clothes - IB2, IB3, BGR2, DG2, CG1 and TN8
  • shopping - DG2, CG1, TN8, DR1, DR3, DR5, DR6, DR7, PP2, PP3, PP4, BP1, GG1, GG2, GG3, GG4 and GG5
  • shadow - BG1
  • sky - IB1
I cut the image out with a oval Spellbinder's nestie and inked whilst still in the die with tumbled galss distress ink. I matted the image onto a larger oval cut from black centura pearl and attached it to the easel part of the card.
I stamped one of the many sentiments from the stamp set, cut it out with an oval nestie, inked whilst still in the die with tumbled glass distress ink and attached it to the stopper with foam pads.
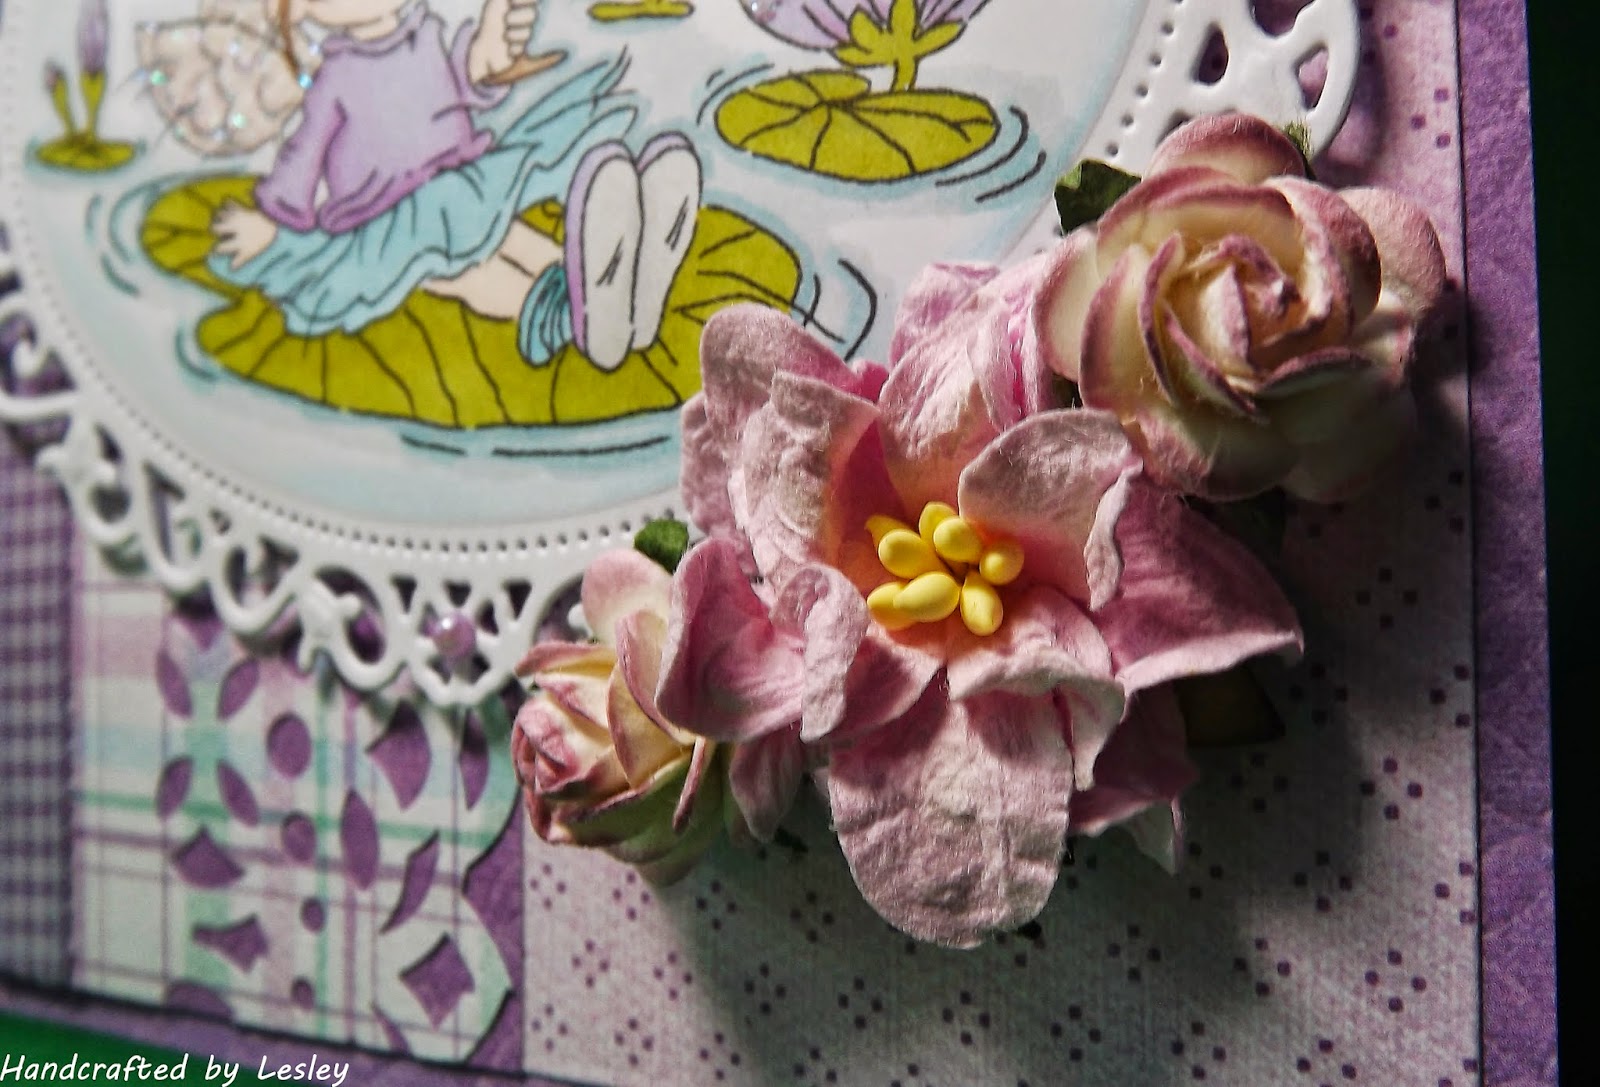
I made a flower using some more of the papers and a Die'sire large rose quilling die. I added a black Dazzler to the centre of the rose and attached it to the stopper as shown. To finish I added some black pearls (from my stash).
Many thanks for stopping by.

Lesley


Thursday 29 May 2014

Autumn

Good morning folks

When I first saw this new stamp collection from Crafter's Companion I knew I had to add them to my collection. I bought 3 stamps, 2 embossing folders and 2 paper pads and I love them. The stamps are big and are great fun to colour. I also tried using some pencils over the top of my Spectrum Noirs but I am not sure of the results. Maybe they would be better if I used the Spectrum Noir pencils but they seem to be out of stock everywhere at the moment.
Here is the first of many cards I have made using the Scruffy Little Cat collection - 
I began by embossing a piece of black centura pearl with a Chic embossing folder (I had to extend it slightly) which I then matted onto a 6 inch card blank (tent fold). I then took one of the papers from the Scruffy Little Cat dark shade paper pad and cut one edge with a Die'sire lace border 6 die. I wrapped a piece of black satin ribbon (from my stash) around the paper and attached it to the card base.
The image is Autumn (from the Scruffy Little Cat range from Crafter's Companion) which I coloured with the following Spectrum Noirs
  • hair - GB1, GB2, GB3, EB3 and a brown pencil
  • shin - FS2, FS3, FS4 and TN2
  • eyes - TB1
  • lips - DR1
  • eyeshadow - TB1 and a blue pencil
  • clothes - DR1, DR3, DR5, LV2, LV3, purple pencil, BGR2, BGR3 and BGR4
  • shopping - IG1, IG3, IG5, IG7, DR1, DR3 and DR5
  • bag and boots - TN7, TN8 and TN9
  • grass and flowers - DG2, DG3, LV2 and LV3
  • sky - IB1 and IB2
I cut the image out using Spellbinder's matting basics A, inked whilst still in the die with tumbled glass distress ink and matted it onto some black centura pearl. I then added some glitter to the eyeshadow and some dots of glitter around the image. I then attached it to the card with foam pads.
I made a flower using another of the papers from the pad and a Die'sire large rose quilling die. I added a black Dazzler to the centre of the flower and attached it to the card as shown.
To finish I added a sentiment from the die set which I cut out using Die'sire elegance stamping frame die. I inked whilst still in the die with tumbled glass distress ink and matted the sentiemnt onto some black centura pearl. I attached it to the card with foam pads as shown.

Thank you for stopping by.

Lesley


Wednesday 28 May 2014

Up, up and away

Good evening folks

I hope you are having a good week. The weather here has been awful so I have managed to fit a little crafting in along with a trip to the cinema. Rio 2 certainly added a little colour to a very dull and damp afternoon. If you have younger children (and a wet day)I can recommend it.
The challenge at Magnolia down under challenge is "Tic tac toe" using the following table -


I chose to follow the bottom line and use metal, embossing and clean and simple. Here is the result -
I began by making a 6 inch card blank using blue centura pearl and my Ultimate Pro. I then embossed a piece of white centura pearl using an Embossalicious embossing folder called clouds. I then matted this onto the card blank.
The image is called Sweet Tilda with balloon which I coloured with the following Promarkers - 
  • skin - satin, dusky pink and coral
  • hair - morning mist, grey squirrel and tawny owl
  • clothes and balloon - powder blue, arctic blue and cornflower
  • sky - pale blue and denim blue
I cut the image out with scissors and attached it to the card base with Pinflair. To finish I added a little blue ribbon bow and a silver heart charm (from The Hobby House).
I would like to enter this card into the following challenge - 

Many thanks for stopping by.

Lesley


Tuesday 27 May 2014

Tilda birthday

Good morning everyone

It's half term week so I have the week off. I intended do some gardening but the weather is putting paid to that. So I did some crafting instead. Here is the result - 
I began by making an easel card with a 6 inch card blank. I punched one edge with a Tonic twisted twine border punch and then matted and layered the card with papers from LOTV's Bonnets and bowties paper pad and Bonnets and bowties solids paper pad.
I made the stopper with some of the papers and attached some lace (from the Ribbon Girl) to the underside of the stopper. I wrapped around some pink ribbon from my stash and then attached the stopper to the card base as shown.
The image is called Tangled Tilda which I coloured with the following Promarkers - 
  • hair - raw sienna, cocoa and cinnamon
  • skin - satin, blush, dusky pink and coral
  • dress - cocktail pink, salmon pink and carmine
  • cake - cornflower, powder blue, pale pink, pastel pink and pink carnation
  • shadow - warm grey 1
  • sky - pastel blue and denim blue
I cut the image out using Spellbinder's floral ovals, inked whilst still in the die with tumbled glass distress ink and then attached to the top part of the card.
I stamped a sentiment from LOTV's sentiments to fit a scroll, cut it out using Spellbinder's Reflective moments and then inked with spun sugar distress ink. I then attached it to the stopper. 
I added lots of pretty flowers from the Ribbon Girl to the stopper and to the top of the card.
To finish I added some pink pearls (from the Ribbon Girl) to the die cut.
I would like to enter this card into the following challenges - 
http://www.ribbongirls.blogspot.co.uk - May Magnolia only challenge - birthday
http://www.allsortschallenge.blogspot.co.uk - week 260 Happy 5th Birthday Allsorts

Thank you for stopping by.

Lesley

Sunday 25 May 2014

Squiffy birthday

Good afternoon folks
I hope you are enjoying your bank holiday weekend. The weather here is awful so I have battened down the hatches and spent the day watching TV and crafting. Lovely!
Here is today's card - 
I began by embossing a piece of kraft card with an Embossalicious Gothic script embossing folder. I covered a 6 inch card blank with the embossed paper and then inked around the edges with tea dye distress ink.
I cut a piece of paper from LOTV's Father knows best paper pad with a Tonic twisted twine die and attached it to the card base at a jaunty angle. I cut another paper from the pad using Tonic layering squares die set and attached it to the card base as shown.
The image is Toot, toot (ST 421) from LOTV which I coloured with the following Promarkers - 
  • hat, gloves and scarf - tan, caramel and cocoa
  • skin - satin, blush and dusky pink
  • hair - warm grey 5
  • car - warm grey 1, warm grey 2, warm grey 3, warm grey 4, warm grey 5, cool grey 4 and cool grey 5
  • ground - warm grey 2
  • sky - cool grey 1
I cut the image out using a Tonic layering square die, inked whilst still in the die with antique linen distress ink and then attached it (at an angle) to the card base with foam pads.
To finish I stamped a sentiment using LOTV's sentiments to fit a scroll set.
I would like to enter this card into the following challenges - 
http://ilovepromarkers.blogspot.co.uk - week 220 - anything goes
http://www.allsortschallenge.blogspot.co.uk - week 260 - Happy 5th birthday allsorts

Thank you for stopping by.

Lesley


Monday 19 May 2014

Lovely lilac

Good evening folks,
I do hope you are all enjoying this beautiful weather we have been having. I afraid crafting has taken a back seat this weekend due to this fab weather but I did manage to have a little play with one of my new stamps from LOTV (which is quite apt for the current weather) and here is the result -
I do love these colours - lilac and purple are such happy colours don't you think.
I got inspiration from LOTV's Saturday sketch blog. I began by covering a 6 inch card blank with a paper from LOTV's Promises solids paper pad and then cutting a Tonic layering square from a paper from the Promises pad. I cut another paper from the Promises pad and punched one side with a Tonic dotty lace border punch. I matted this onto another paper from the solids pad and then added some ribbon (from my stash). I attached this to the square die cut and then attached the whole thing to the card base.
The image is Water Lily (ST504) from LOTV's latest stamp launch which has been coloured with the following Promarkers - 
  • hair - mustard, cocoa and burnt sienna
  • skin - satin, blush and dusky pink
  • clothes, shoes and glasses - lavender, orchid, amethyst, duck egg, cool aqua, turquoise, cool grey 1, cool grey 3 and cool grey 4
  • water lilies - pear green, marsh green, moss green, lavender, orchid and amethyst
  • wings - ivory and pastel beige
  • water - april shower, oasis and rockpool
  • sky - pastel blue
I added lots of glitter (well she is a fairy and fairies demand glitter!) to her glasses, wings and the water lilies. I cut the image out using Spellbinder's Floral ovals and inked whilst still in the die with tumbled glass distress ink. I attached the image to the card with foam pads.
To finish I added some flowers (from the Ribbon Girl) which I coloured with milled lavender distress ink and some tiny pearls which I coloured with a orchid Promarker.

I would like to enter this card into the following challenges - 
http://www.ribbongirls.blogspot.co.uk - May colour challenge - lilac/purple

Thank you for stopping by

Lesley


Thursday 15 May 2014

Catman

Hello folks

Now I know this is completely the wrong time of year for this type of card but I love this stamp - it makes me smile.
I began by covering a 6 inch card blank with black card. I then cut a square of orange card (using my Tonic layering square die set) and attached a dotty mask to it. I ran it through my Grand Calibur to emboss it and then rubbed black soot distress ink all over it. I removed the mask and attached it to the card base.
I cut several pumpkins using a io die set from orange card and attached them to a strip of black card. I then added the border to the card base.
I then cut 2 webs using Memory Box delicate web die from black card and attached them to the top of the card. I trimmed them to fit.
The image is Penny Black's Catman which I coloured with the following Promarkers - 
  • cat - cool grey 1, cool grey3, cool grey 4, cool grey 5, pastel pink and baby pink
  • pumpkin - mandarin, orange and burnt orange
  • shadow - warm grey 1 and warm grey 3
  • sky - pastel blue, denim blue and colbalt blue
I cut the image out with Die'namics stitched circle stax die and once removed from the die I inked the outer edge of the die cut. I then matted the image onto an orange faux circle and then onto a black stitched circle. I attached it to the card with foam pads.
To finish I added 3 bats cut using black card and the io die set.

I would like to enter this card into the following challenge - 
http://pennyblackatallsorts.blogspot.co.uk - May challenge - anything goes

Many thanks for stopping by

Lesley


Tuesday 13 May 2014

Owl always love you

Good morning folks

The folks at Penny Black Saturday challenge would like to see projects made with "Your favourite Penny Black stamp". I don't have many Penny Black stamps so it could be said that they are all my favourite. I chose to use "Owl always love you" - 
I began by matting and layering a 6 inch card blank with papers from LOTV's Heartfelt paper pad and wrapped some red lace from the Ribbon Girl round the top papers.
I stamped the image and coloured it with the following Promarkers - 
  • hearts - poppy, berry red and crimson
  • owls - ice grey 1, ice grey 2, ice grey 3, ice grey 4, ice grey 5, poppy, berry red and crimson
  • sky - pastel blue and denim blue
  • ground - olive green
I cut the image out with Spellbinder's heart circles and inked whilst still in the die with tumbled glass distress ink. Once out of the die I inked the outer edge with peeled paint distress ink and attached the topper to the card with foam pads.
To finish I added some heart gems to the die cut.

I would like to enter this card into the following challenges - 
http://pennybfriendssaturdaychallenge.blogspot.co.uk - May challenge - favourite Penny Black Stamp
http://pennyblackatallsorts.blogspot.co.uk - May challenge - anything goes

Many thanks for stopping by.

Lesley


Sunday 11 May 2014

Fairy magic

Good evening folks

Oh no !!! My crafty mojo has packed his bags and left me bereft this week. I have had this gorgeous image stamped out with the pretty papers sitting next to her for a week and for the life of me I could not think of what to do. So I hopped off to LOTV's monthly challenge blog (to see what the challenge was) and found their sketches section and made this card -
I used sketch #4 but turned it 90 degrees. I am really rather pleased with the result.
I began by cutting a piece of LOTV's Promises paper pad with my Tonic layering squares, inked the edge with milled lavender distress ink, layered it onto a piece of paper from LOTV's Promises solids paper pad (bought to make my Promises pad go further) and trimmed it with my perfect layers tool. I then followed the sketch to create the card base. I used a Docrafts border punch to trim the blue border and added some ribbon from my stash. I inked the edge of of a 6inch scalloped card blank with milled lavender distress ink and attached the layered papers.
The image is LOTV's dandelion clocks (ST144) which I coloured with the following Promarkers - 
  • hair - spice, terracotta and chestnut
  • skin - satin, blush and dusky pink
  • clothes and shoes - lavender, orchid, amethyst, duck egg, cool aqua, cool grey 1 and cool grey 3
  • wings and dandelion - ivory, pastel beige, khaki and henna
  • sky - pastel blue and denim blue
  • ground - warm grey 1 and warm grey 3
I cut the image out using Spellbinder's Floral ovals and inked whilst still in the die with milled lavender distress ink. I attached the image to the card base with foam pads. The sentiment is from LOTV's sentiments to fit scrolls which I cut out using Spellbinder's Reflective moments and inked whilst still in the die with milled lavender distress ink. 
I made some flowers using the papers and Tonic's petal pairs punches and added some pearls (from the Ribbon Girl) to the die cut, centre of the flowers and to the top corner of the card.
I would like to enter this card into the following challenges - 
http://www.ribbongirls.blogspot.co.uk - May lovely lili challenge - add pearls

Thank you for stopping by.

Lesley

Wednesday 7 May 2014

A big bunch of flowers

Hello everyone

This week's challenge at the Ribbon Girls is flowers. Here is my card for the challenge - 
I began by covering a 6 inch card blank with blue centura pearl card. I then trimmed a piece of paper from LOTV's Petal fresh paper pad, punched one side with Tonic's rose lace border punch and attached to the card base. I cut a Memory Box Fairytale flower border from blue centura pearl and added it to the card base as shown.
The image is from LOTV and is called Thomas - big bunch of flowers (ST027) which I coloured with the following Promarkers - 
  • Thomas - coral, warm grey 1, warm grey 2, warm grey 4 and warm grey 5
  • flowers - vanilla, mustard, powder blue, cornflower, pear green and pine
  • shadow - cool grey 1
  • sky - pastel blue and denim
I cut the image out using a Spellbinder's circle nestie and inked whilst still in the die with tumbled glass distress ink. I cut a Spellbinder's butterfly circle from blue centura pearl and matted the image onto it then attached the whole thing to the card base with foam pads.
I added lots of flowers from the Ribbon girl. I didn't have any yellow flowers (an oversight on my part which I will have to rectify with a shopping trip - ooooh goody!!) so I inked the edges of some white flowers with old paper distress ink. I also added some blue centura pearl leaves cut using Spellbinder's jewel flowers and flourishes die set.
To finish I added some butterflies to the lace edge (these were the "waste" from the heart circle die - waste not want not!!). I put some pearls in the centre of each butterfly which I coloured with a cornflower Promarker.
I would like to enter this card into the following challenge - 
http://www.ribbongirls.blogspot.co.uk - May card challenge-flowers

Thank you for stopping by

Lesley


Tuesday 6 May 2014

Pink butterflies - double take

Hello folks,

Butterflies seem to be a popular choice for challenges this week. The ladies at In the Pink would like to see cards to fit the challenge "Fluttering by ....... (use a butterfly)" so here is my card for the challenge - 
 I began by making a 6 inch card blank from pink centura pearl and my Ultimate Pro. I then cut a piece of butterfly paper from my stash (it's called Forever Friends with love but I have had it for years) and matted it onto a piece of purple card. I cut a Memory Box Kensington border (love this die, it is so delicate) from pink centura pearl and added it to the edge of the butterfly paper, then wrapped a piece of pink spotty ribbon around the card and attached the whole thing to the card base.
The image is Tilda with butterfly dreams from Magnolia which I coloured with the following Spectrum Noirs -
  • skin - FS2, FS3, TN2 and CR3
  • hair - GB2, GB8 and GB10
  • dress and shoes - PP3, PP5 and DR3
  • socks - PP1 and PP3
  • flower - PP1, PP3, PP5 and DR3
  • butterflies - PP1, PP3, PP5 and DR3
I cut the image out using Spellbinder's lacy ovals, inked whilst still in the die with spun sugar distress ink and added some shabby pink frantage.
I made some flowers using Tonic's petal pairs and some scraps of papers and added some pink pearls (from the Ribbon Girl) to the centres of the flowers. I attached them to the card base with Pinflair.
I cut some butterflies using Tonic's Mazarine Blue die set and pink centura pearl, and attached them to the card. To finish I added some pink pearls to their bodies.

I would like to enter this card into the following challenge - 
http://inthepinkchallenge.blogspot.co.uk - challenge 43-fluttering by....use a butterfly

Thank you for stopping by.

Lesley


Monday 5 May 2014

Beautiful sunflowers

Hello everyone, I hope you are enjoying the Bank Holiday. The weather here is lovely and I hope it is with you too.

The challenge at Crafty Little Fairies is now a monthly one and for this month the challenge is "In the Garden". Here is my card  - 
I began by making the backing paper. I cut a 6 inch piece of card and randomly stamped a large sunflower stamp (by Chloe) all over the card. I then coloured the flowers with tulip yellow, sunflower, gold, caramel and umber Promarkers. For the background I used pastel blue and denim Promarkers.
I then trimmed the card to 5and half inches, matted and layered it onto blue centura pearl and yellow core'dinations and attached it to a 6 inch card blank.
The image is Tatty's sunflowers from Tatty Button which I coloured with the following Promarkers - 
  • hair - terracotta, chestnut and burnt umber
  • skin - satin, blush and dusky pink
  • dress and shoes - berry red, crimson and cardinal red
  • sunflower - tulip yellow, sunflower, gold, pear green, pine, holly, caramel and umber
  • tights - soft lime and primrose
  • sky - pastel blue
  • soil - caramel and umber
I cut the image out with scissors and matted it onto a rectangle of blue centura pearl. Then I matted it onto a Spellbinder's branching out die cut in yellow core'dinations. I attached it to the card base with foam pads.
To finish I added a sunflower made using Spellbinder's Die D-lites create a sunflower die set. These are a bit fiddly to make but the results are amazing. 

I would like to enter this card into the following challenge -

Many thanks for stopping by. Enjoy the rest of your Bank Holiday.

Lesley